Download (all) Scripts from Maximo / ICD to your Eclipse Project

In one of my last blogs I showed a very nice way how to upload Jython scripts from Eclipse to your Maximo / ICD environment. Now what about the situation that you already have a Maximo / ICD environment with tons of scripts in it? In this blog I will show you a simple way how you can include all these scripts to your Eclipse project within 15 minutes. This will also include the first comment lines needed for the later upload.

To achieve our goal the following steps are needed:

  • Setup an application export in the Autoscript application
  • Download a XML File including all scripts
  • Run a Jython script to extract all the unique scripts

Setup an application export in the Autoscript application

The application export will be configured using the “Object Structures” application. Launch:

Go To > Integration > Object Structures

In the Object Structures application search for the “MXSCRIPT” Object Structure and open it.

Selection_018

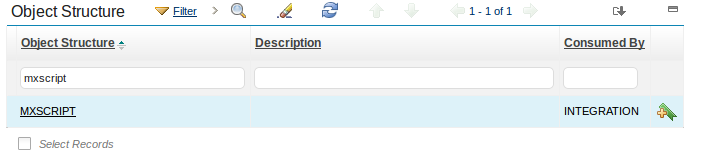
After opening select an action:

Select Action > Add/Modify Application Export Support


Menu_020

In the dialog box create a new row in the table using the values shown here:

Selection_021

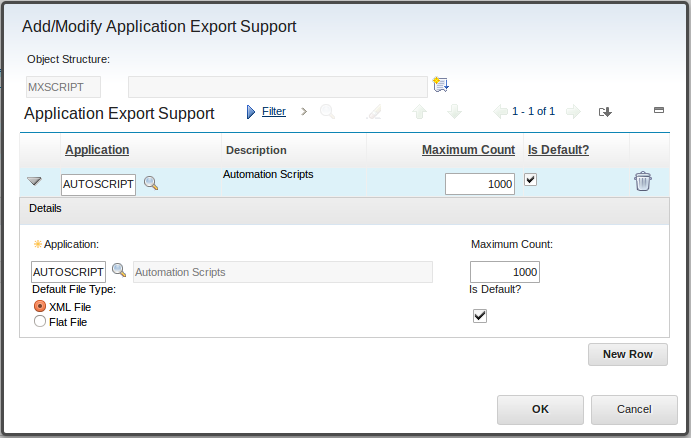
Press OK. The export support now has been created. Next step is to grant the security rights to the user group which should use the tool. In my example I will grant the rights to the maxadmin group. Goto the following Menu:

Go To > Security > Security Groups

Now perform the following steps:

  1. Search and open the security group you want to grant the rights to.
  2. Change to the “Applications” Tab.
  3. Filter for the Application “Automation Scripts” and select the record.
  4. In the Options for Automation Scripts section enable the option “Application Export”.Selection_022
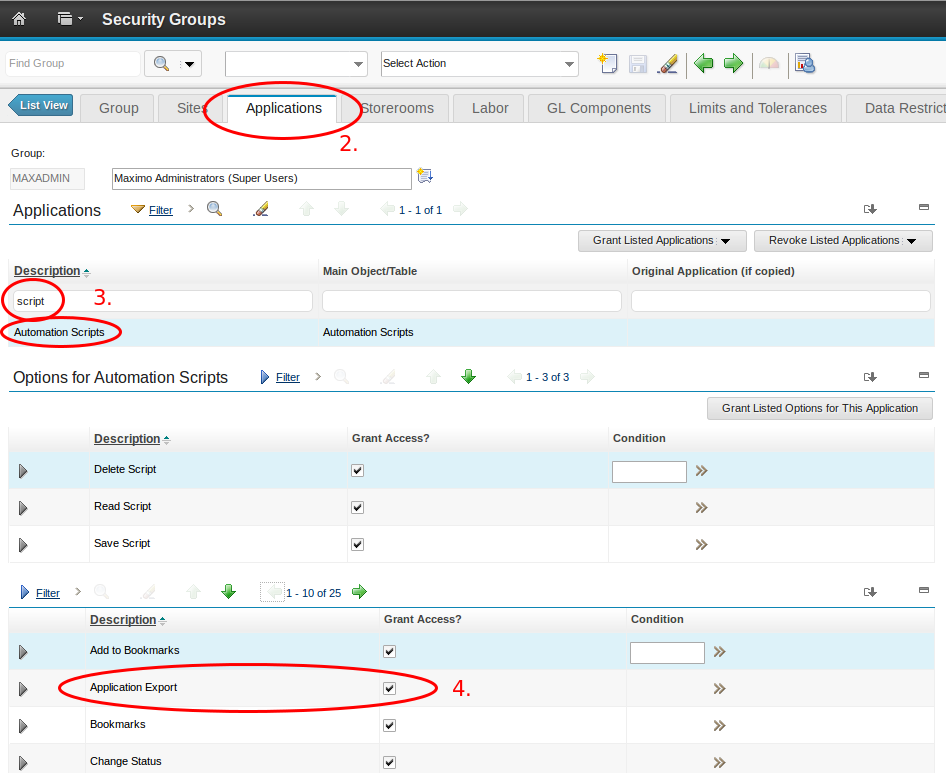
  5. Save the Security Group.
  6. Logoff and Logon again to Maximo / ICD. Be sure that all your user sessions are successfully logged of – otherwise the settings will not be activated.

Download a XML File including all scripts

To download a XML File which includes all scripts in your system you have to go to the Automation Scripts application.

Go To > System Configuration > Plattform Configuration > Automation Scripts

If the previous step worked correctly you should now see a new Icon in the iconbar Selection_023for the application export. Before you press this button you have to search for the scripts to export. If all scripts should be exported just press enter in the search field. Now press the icon.

In the “Application Export” Dialog you just can take all settings and press “OK”.

Selection_024

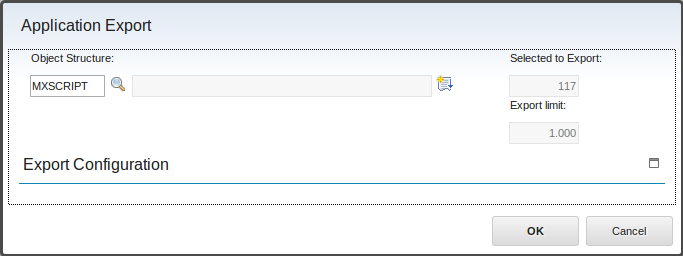
The XML File now will be downloaded to the download directory of your browser on your local PC.

Run a Jython script to extract all the unique scripts

First of all you have to have a project setup in Eclipse where you would like to store your downloaded scripts. This chapter requires a complete project-setup using Eclipse, Jython and PyDev like described in this blog. Copy the downloaded XML file to this directory and name it scripts.xml.

Now create a Jython script with the following code:

#AUTOSCRIPT:EXPORTSCRIPTS
#DESCRIPTION:Script to export all Jython Scripts on a Server
#LOGLEVEL:ERROR

from java.io import File
from org.jdom.input import SAXBuilder

xmlFile = File("scripts.xml")
builder = SAXBuilder()

document = builder.build(xmlFile)
wrap = document.getRootElement()
ns = wrap.getNamespace()
rootNode = wrap.getChild("MXSCRIPTSet", ns)

liste = rootNode.getChildren("AUTOSCRIPT",ns)
for i in range(0,liste.size()):
    node = liste.get(i)
    scriptName = node.getChildText("AUTOSCRIPT",ns)
    scriptDesc = node.getChildText("DESCRIPTION",ns)
    scriptVersion = node.getChildText("VERSION",ns)
    scriptDebug = node.getChildText("LOGLEVEL",ns)
    scriptCode = node.getChildText("SOURCE",ns).encode('utf-8')
    
    scriptFile = open(scriptName + ".py","w")
    scriptFile.write("#AUTOSCRIPT: " + scriptName + "\n")
    scriptFile.write("#DESCRIPTION:" + scriptDesc + "\n")
    scriptFile.write("#VERSION:    " + scriptVersion + "\n")
    scriptFile.write("#LOGLEVEL:   " + scriptDebug + "\n")
    scriptFile.write(scriptCode)
    scriptFile.close()

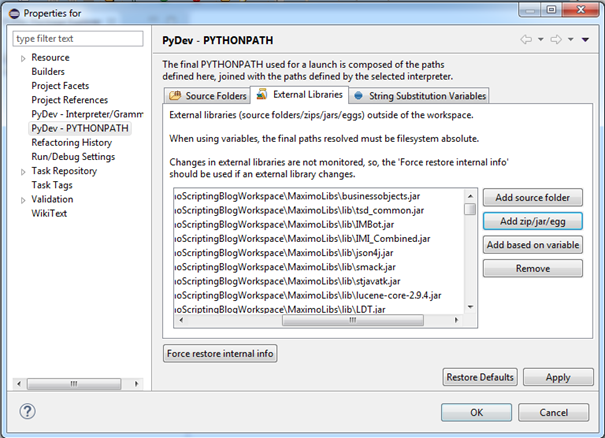
This scripts requires the Java JDOM Class. Please ensure that the jdom.jar file is included in your PYTHONPATH. You can check this by right-click on your Eclipse project and select the “Properties” Menu. Check under “PyDev – PYTHONPATH” if jdom.jar is existent. If not use the “Add zip/jar/egg” Button to add it.

Selection_025

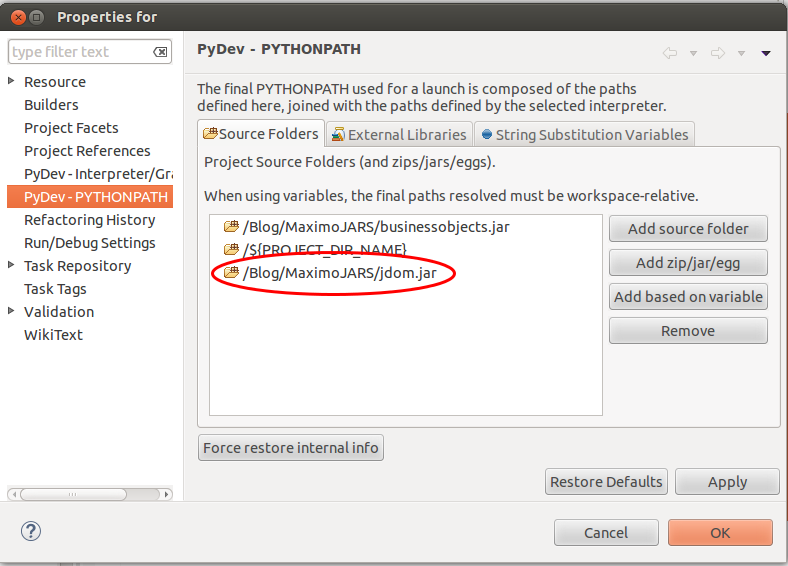
Remark: If you don’t have a local version of jdom.jar you can find one on your Maximo / ICD Server in the following directory: %WEBSPHERE _DIR%\AppServer\profiles\ctgAppSrv01\installedApps\ctgCell01\MAXIMO.ear\lib

Everything is prepared now. You can run the Script now from Eclipse using the Run Icon Arrow  Selection_009 and then the following menu:

Menu_026

Hopefully after a refresh of your project/folder (F5) you will see a bunch of new scripts! Congratulations!

Setting up Eclipse for Maximo / ICD Jython development

Introduction

When you start developing Jython scripts in context of Maximo & ICD the first question is where to edit the scripts. The provided editor in the Web-interface of the product can only be seen as a “Paste-In” area, since it absolutely lacks any needed development features. Better alternatives at this point can be the usage of more professional editors like UltraEdit or Notepad++. If you only want to develop a small set of short Jython scripts this can be a starting point for you. If you plan to do a bit more development I would highly encourage the usage of a professional development environment. In this article I would like to show you how you can set up the Eclipse platform to perfectly act as a Maximo & ICD development environment. I will guarantee you that the benefits of this platform over time are major, even if it is a bit work to setup at the beginning.

Required Software

So before we start let’s figure out, which software is needed for the installation:

  • Eclipse Luna (Download) (64 Bit)
  • Java JRE or SDK V1.7 or V1.8 (64 Bit) *** please see notices below
  • Jython Interpreter V2.5.2 (Download) – Even it is quit old – this is the used Version in the product.

Notices on Java:
For the development of Jython scripts the used JRE or SDK is really important. For Maximo/SCCD 7.5.x (TPAE 7.5) you need at least a JRE Level of Version 1.6 for Maximo 7.6 (TPAE 7.6) you need at least a JRE Level Version 1.7. I personally always try to use the IBM Java in the version 1.7 and set the JRE Compliance level to 1.6 if needed. I will show you later on how to set this – don’t care for the moment.

The download of the IBM Java is a bit tricky to find. The base download page is can be found here. For Windows you need to download the complete “IBM Development Package for Eclipse”, extract it and take out the JRE directory. You should use Version 5.0 64-bit which includes Java 7.1 (1.7).

Installing the Prerequisites

The installation of the software is described in this section.

  1. Eclipse installation

For Eclipse no special installation is required. It basically only needs to be extracted to a folder of your choose. On the first start you can select the folder where you would like to store your eclipse workspace (data-directory).

  1. Java JRE (optional – you may use your system JRE)

Depending on the Java Version you have to either run a setup program or just copy some files. The installed Java does not have to be the system Java! This is important to know if you use different software on your computer which requires a certain version of Java.

If you use the “IBM Development Package for Eclipse” just extract the “ibm_sdk71” subfolder to a folder on your local harddisk for later usage.

  1. Jython 2.5.2 Installation

Jython Installation is quit straight forward using the setup program. During installation you are asked for the Java Home directory where you should be careful to select the one provided by the Java JRE Installation.


Configuration of the Java Environment (optional)

At this point we need to set up the correct Java Environment Eclipse should use.

  1. In Eclipse go to “Window –> Preferences”.
  2. In the left navigation pane go to “Java –> Installed JRE’s”. In the window on the right you should see the currently installed JRE selected. If you have installed an additional JRE and want to make this the default JRE select the Add button on the right.
  3. Select “Standard VM” and “Next…”
  4. The next screen requires the definition of the new JRE. If you select the correct installation directory for your JRE home the rest of the Fields should be filled in automatically:
    eclipsejre1
  5. After selecting “Finish” a new SDK is available. The SDK which is checked and bold is the default SDK.

At the end the right Java compiler must be selected:

  • Maximo 6: Java 1.4
  • Maximo 7: Java 1.5
  • Maximo 7.5.x: Java 1.6
  • Maximo 7.6: Java 1.7

Set it in Eclipse preferences: Windows –> Preferences –> Java –> Compiler  –> Compile compliance level.

eclipsejre2

Installing the maximo.ear

The maximo.ear contains most of the Java method’s to operate on all kinds of Mbo’s and MboSet’s within TPAE. One of the best features of using Eclipse in comparison to a simple text editor is, that we can include the businessobjects JAR file from your Maximo/ICD installation and that we have some syntax checking and input features for these classes. I will show you in a later post how we can utilize these features to make our life easier.

The best way to make the JAR file available is to create an own project in Eclipse for the referenced Java libraries.

  • Select “File –> New –> Java Project” in the Eclipse Workbench with the name “MaximoLibs”.
  • Copy [SMPDIR]\maximo\deployment\default\maximo.ear from your admin workstation into the new project.
  • Extract the following files from the maximo.ear file:
    • jar
    • war and extract the content to a directory named maximouiweb
    • lib/*.jar files to a directory lib
  • Refresh the project tree in Eclipse (F5). Your project should now looks like follow:
    eclipsejre3

Installing the PyDev Plug-In in Eclipse

After the initial start of Eclipse and the selection of a workspace directory you find yourself in the Welcome screen, which should be closed using the “Workbench” symbol in the upper right corner.

To install PyDev select the Menu “Help à Install new Software…”

  1. Enter the text http://pydev.org/updates into the Work with text box.
  2. Select only the PyDev checkbox
    pydev1
  3. Press the Next Button…
  4. You get the Installation Details displayed where you also can press “Next”
  5. Accept the License and press “Finish”. The installation starts.
  6. At the end of the installation you are asked to restart Eclipse. Please answer with “Yes”.

Configuring PyDev in Eclipse

To configure PyDev perform the following steps:

  1. After Restart, click Window and then click Preferences.
  2. Find the entry “Jython Interpreter” as shown in the picture and select “New…”
    pydev2
  1. Enter “Jython 2.5.2” as the Interpreter Name and find the jython.jar file from your previous Jython installation. Select “OK”.
    pydev3
  2. The configuration starts. Select OK in the dialog which appears.

At the End your Jython Interpreter Configuration should look similar to this one:

pydev4

Create a new PyDev project

Now create a new PyDev project where you can store you Jython sources.

  • Select: File –> New –> Project
  • Select the wizard PyDev Project and select Next
  • Enter a project Name and select the correct Project Type Jython and the Grammar Version 2.5 with your defined Interpreter.
    eclipsejre4
  • Press Finish.

You get a question if the associated PyDev perspective should be opened. Select Yes.

Congratulations you have your first Python/Jython project. There is still one little piece missing…

Referencing the Maximo Java libraries

In a previous step we have extracted the Maximo related Java libraries. To use them in our Jython project we need to reference them.

  • Right click to your new project in the PyDev Package Explorer window and select properties.
  • In the property window select the option “PyDev – PYTHONPATH”
  • Select the tab “External Libraries”.
  • Using the “Add zip/jar/egg” button you can add all required libraries from the referenced project. At least the businessobjects.jar file should be added, but all other jar files could be added in addition. At the end your configuration looks like this:
    pydev5

Creating your first Jython Script

To create the first Jython script right click on your newly created project and select New –> File in the Popup Menu. Select a filename of your choose with the extension “.py” and click on Finish.

You are asked for the Default Eclipse preferences for PyDev. Just click ok.

You are now ready to create your first Jython script, but this is a story for another post.